Making a T-Shirt in GIMP (First Tutorial Project).
Ok so I’m going to start on my first proper T-Shirt. Most tutorials seems to start with this, but that is because they are fairly easy and a good start point. Once you have mastered the T~Shirt it gives you a good Idea of what the lines and colours on the templates do. I will be adding Screen-shots to this to help you see what I am talking you through.
If you haven’t downloaded the Layered templates from either Robin wood or Chip midnight, then do so now. You need the Layered.PSD Files. I use Robin Wood’s here. You will need to use the left hand Navigation to scroll down to AV UV Templates and Click. Then scroll down the main page to the downloads. You need the Layerd Photoshop .psd files. Select the “ALL” Download, it should be 7.6MB. Extract the LAyered UV’s Folder if you are using Windows or Linux, or the Mac_OSX Folder if you use a mac. Be sure to extract it to a folder where you will know where to find it again.
Firstly open GIMP (I am using Gimp so things might be slightly different in your favourite graphics program) and open the Top Layer template. You should save this as something new right away so you don’t accidentally save over the template. So click File>Tools>Save as and rename it as tshirt1.xcf (.psd works too although technically its for photo-shop). Now you need to make sure the Layers, Channels and Paths box is open. To do this go to File>Dialogues>Create New Dock>Layers Channels & Paths.
Figure 1:

The image is set to 1024×1024 but it shows as 50% zoomed in, This makes the initial part easier. You need to ass a couple of new layers. One white Background so you can see what you’re doing and one Transparent layer for the shirt. Here is how we do that:
1 ~ Background layer. Select the layers channels and paths Icon, about halfway down is an add new layer button (Figure 2 outlined in red). Select that. A box should come up (Figure 3) , select White and name it bg (Fig 3 outlined in red)(There is already a layer called background and we don’t want to confuse the matter). Hit ok and then use the down arrow in layers channels and paths (Figure 2 outlined in blue) to move that layer to the very bottom of the layers.
2 ~ Shirt layer. Do exactly the same as above but when the box comes up name it Shirt and select Transparency (Figure 3 outlined in blue). Then hit ok and use the up/down arrows to make sure it sits between the SubDivided UV’s and the bg layers.
Figure 2:

Figure 3:

Now we are ready to begin working on the shirt. To save time doing this every time you make something you could always save the templates with a background and transparent (in this case called shirt) layer. For now though we will just carry on with the shirt. Make sure that the shirt layer is selected/highlighted in the layers, channels and paths window and lets begin.
Ok, The tools I shall be using and showing you how to use are here:
Figure 4:

Lassoo Tool = Red. Path Cut Tool = Blue. Bucket Fill tool = Green. Paintbrush Tool = Yellow. Refer to this as often as you need to. 🙂
We will be making a simple black T-Shirt with a simple easily brushed motif on the front. First we will be using the Lassoo tool to separate off the back of the shirt and then we are going to use the Bucket Fill tool to fill it in. It doesn’t matter if the colour goes past the shirt so long as it doesn’t go over the front of the shirt ot the arms underneath.Then we will be using the Path Cut tool to cut away a nice neck line for the shirt.
Stage one and two of this process:
Stage One. Select the Lassoo Tool and carefully draw around the back of the shirt (on the right side of the image), making sure not to get any of the front of the shirt or the arms/fingers in the area. Make sure to start at the top, draw down, around the bottom and back up to the top then let go. It should add the top line for you automatically. Be sure that the whole back of the shirt is inside the lassoo outline.

Now select the Bucket Fill tool and select a colour that you wish your T-Shirt to be. I am choosing Black. Make sure the foreground fill button is selected and click anywhere inside the Lassoo Hoop.

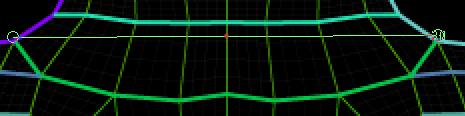
Don’t be alarmed at the sudden change in the mesh detail, You can still see the important parts. Now we are going to use the Path Cut tool to create a neck line for the T-Shirt. Otherwise it won’t look nice when you upload it to Second Life and make the T-Shirt. It is advisable to zoom in here to 200% and scroll to the top tight of the image. You want to be able to see the neck and the thick green line shown here:

The thick green line is going to be the guide line that you use for the neck line of the shirt. Select the Path Cut tool, make sure that “Design” is selected in the main GIMP menu under the tool box and select from the top of the image to the two top edges of the thick green line one at a time, then back up to the top of the image (See the image directly below for visual reference). You want to select a fraction above the purple and turquoise lines to make sure you get a smooth front and back seam when wearing the shirt in SL.

You an just see my path cut line up there. Now select “Edit” in the same menu where you found design. See where the red dot is on the above image? That is where the center of the line is, the vertical straight green center line of the shirt helps locate this. Now click where my red dot is (you won’t have a red dot) and pull the path cut line down from there until you get a nice neck line. Once you are happy with your neck line go back to the menu under the tool box and click “Select from path” Then go back to the Shirt window, select Edit and Cut. Hey Presto! You have a neck line!

Now Zoom back out to 50% and follow the exact same steps for the front of the Shirt and then we will be ready to Add a logo and do the sleeves.
I mentioned downloading Brushes for GIMP in my previous Blog. Here I am going to use one of them. If you haven’t downloaded any you can use one of the brushes that already come with GIMP, Such as the Pencil Sketch, Vine or Pepper.
Select the Paint Brush tool from the GIMP Tool box, then look down to the menu below and pick a Brush to use. You may want to open a new file, fill it in black and play with the brushes in there a bit to see which you like. Remember to choose a colour for the motif! I am going to use White as it shows up on Black very well. You can change the size of the brush too with the “Scale” slider, Its pretty sensitive so input numbers manually if it is too sensitive for you.
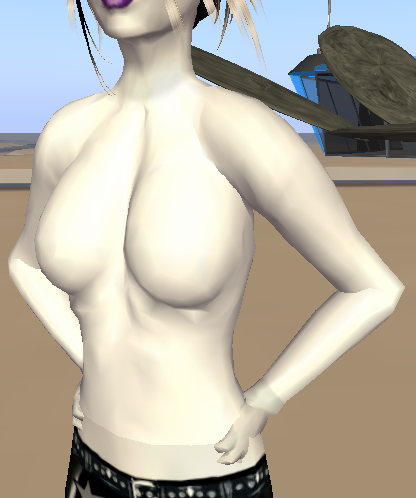
Now you have picked your bush hover it over the front part of the shirt and place it, If you don’t like the placement then use CTRL+Z once to undo and then you can redo. Undo works for everything you do, so if you make a mistake just undo and then you can redo what you made a mistake on. Remember that if the T-Shirt is meant for a Female Avatar then you have to be more careful with the placement, as breasts will skew the image a little. It helps to zoom in to 100% to see the detail better on the mesh lines and to place the logo. The blue lines show where the breasts will sit so you can work with/around them. I created a simple Flower with one click of the Brush.

So we’re ready to make the sleeves and then save it ready to upload, So stay zoomed in at 100% and scroll to the bottom left of the image. Using the Path Cut tool cut around the top ends of the sleeves. Make sure you make a nice straight cur along the inside line of the pink strip on the arm. I have circled them in blue in the below image to show you where I mean. Make sure you click the top and bottom of the pink line. I have marked the places I mean in red so its easily visible. Go to the GIMP Menu under the tool box and select “Edit” and then “Select from Path”. Go to the tool box and select the Bucket Fill tool, select the colour you made your main T-Shirt in (in my case, black) and fill inside the path cut with it.

If you Zoom back out to 50% you should see something along the lines of this:

Now for the last part. It is important to make the Shirt layer an Alpha Channel, Luckily GIMP is nice to us and will do it automatically if we do the following.
Go to the Layers, Channels and Paths Window. See the eyes on the left next to every layer? Click on all of them -except- the one next to the shirt layer. All the other layers should now hide themselves and the eyes will disappear. The only layer left with an eye nest to it is the “Shirt” Layer. Make sure that layer is also selected/highlighted.

Now click the Channels tab at the top (outlined in red in the image below) and make sure that the bottom (shirt) layer has Alpha in it (Underlined in red in the image below).

Now navigate back top the T-Shirt window and Zoom in to 100%. Then Scale the Image to 512×512 (This is plenty big enough to upload to Second Life).


Select File>Save As… and Save the Shirt with a memorable name (I am calling mine flowertee1 and use .tga at the end instead of .xcf. On the first box to pop up just select Export, and on the second UNCHECK RLE Compression and Origin Bottom Left. Otherwise it will save to the bottom left and compress, and when you go to upload it to SL it won’t be in the right place on your Avatar.


Congratulations on completing the hard part! I’m now going to show you how to upload the T-Shirt and Make/wear the Shirt in Second Life. It will cost you 10L$ to upload your shirt to SL, so make sure you are happy with the preview before uploading! Lets fire up Second Life now and begin!
First lets do the preparations inside Second Life. Open your inventory and select Create>New Clothes>New Shirt. It will appear in your inventory in the Clothing Folder as “New Shirt”. Then Right click it and wear it. It will look something like this:
Ok now lets upload our T-Shirt. Go to File>Upload and find your T-Shirt.tga and select ok.
Second Life should bring you up a preview box. Select image preview for Female or Male (depending on who the shirt is made for) Upper body and move the camera angle to get a good look at it. Then Click Upload. It should upload like this:


Now close the open texture and Right Click on yourself and select “Appearance” from the pie chart. You will be taken into the Edit Appearance mode. Now select from the left hand menu “Shirt” and then select the “Fabric” box.

It will list your inventory in a new window, find your Textures Folder and open it, then find your T-Shirt texture and select it. It will then add it to the shirt.


Hit Select. You will see some options to edit the shirt somewhat in shape, you may like to leave it as it is or you can make the bottom longer so it doesn’t show your Avatars belly. Its better to make the T-Shirts longer for Male Avatars. Click on Save as, Name your shirt and then close out of the Edit Appearance Window.

That’s it!! Congratulations on Making your First Second Life T-Shirt and well Done. Keep practicing with different styles and you’ll be an expert in no time at all.

Phoenix Kattun ~x~

aji said,
November 25, 2008 at 9:58 pm
nice tutorial, thanks for tutorial, but i still have problem.. i can’t create cloth texture with gimp, can you help me? send me tutorial.
Brianna said,
March 4, 2009 at 1:26 am
can you make more tutorials ? this one really really helped me!
Sebal said,
April 21, 2009 at 9:58 am
thx for this exellent tutorial… very easy to follow.
cant seem to make shirt cover all of my belly, already says 100%.
probably need to adjust height of my avatar or something. this is one of the best tutorials i have found in awhile. keep em’ coming 🙂
Kayla Souther said,
July 28, 2009 at 8:07 pm
Does this require a certain program of Gimp? like Gimp2 or Gimpshop?
Jonda said,
March 3, 2010 at 11:24 pm
When i fill with the bucket fill, i get nothing on the screen? am i missing a step?
Danica Sparta said,
April 24, 2010 at 5:35 am
This Tutorial was Fabulous! Except that when it came time to use the Paintbrush, I couldn’t get anything to show up from the paintbrush in any form. I tried changing size, effect, none of it wanted to leave an impression on my T-shirt, so it was blah black 😦
Please help! Thanks so much.
Danica
domo said,
July 25, 2010 at 10:19 am
i need help !
i don’t lnow, but i can’t uncheck origin at bottom left ?!
please reply, thank 🙂
funny t shirts uk said,
December 21, 2011 at 2:26 am
I feel this is one of the so much vital info for me. And i am glad studying your article. However wanna commentary on some basic things, The web site style is wonderful, the articles is actually excellent : D. Just right process, cheers
nyc escort service said,
April 16, 2013 at 11:24 am
When I lived in Coconut Orchard me to Direct everything off, and put
a small-scale partner off of men’s packer’s on, envisage my revulsion!
If you’re not measured, you might young attractive charwoman At that place is many things i like to do and not merely in the sex department “lol”.
snowlyjam said,
July 10, 2013 at 3:31 am
hello
vem said,
November 24, 2018 at 6:30 pm
Приветсвую на одном из сайтов нашел дестелятор теперь хочу подарить папе, только вот не знаю про эту фирму ничего, как вы считаете стоит взять
самогонные аппараты добрый жар люкс отзывы
homebased said,
October 27, 2019 at 12:48 pm
http://home-babos.ru